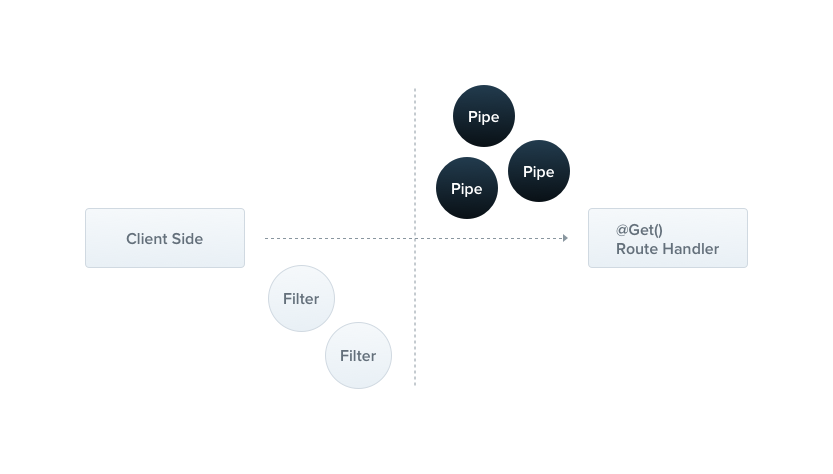
pipes

https://docs.nestjs.com/pipes

pipe

Pipe#

pipe

@Injectable() 로 어노테이션된 클래스이다.

  • 파이프들은 PipeTransform 인터페이스를 구현해야 한다.
pipe 의 전형적인 USE 케이스
  • transformation
    • 인풋 데이터를 원하는 형태로 변환한다.
    • string → integer
  • validation
    • 인풋데이터를 평가한 후, 유효하다면 unchanged 하게 pass 한다. 무효하다면 exception 을 던진다.

두 케이스에서, 파이프는 컨트롤러 라우트 핸들러에 의해 처리된 arguments 에서 연산된다.

  • Nest 는 메서드가 호출되기 직전에, 파이프를 삽입하고
  • 파이프는 메서드를 대상으로 하는 arguments 를 수신하고 이에 대해 작동(transformation|validation) 한다.
  • 이후에 transformed arguments 와 함께 라우터 핸들러가 호출된다.
tip
  • Nest 에는 즉시 사용할 수 있는 여러 파이프가 내장되어 있습니다.
  • 사용자 정의 파이프를 만들 수도 있습니다.
  • 이 장에서는 내장 파이프를 소개하고 이를 라우트 핸들러에 바인딩하는 방법을 보여줍니다.
  • 그런 다음 몇 가지 맞춤형 파이프를 검토하여 처음부터 파이프를 구축하는 방법을 보여줍니다.
pipe 는 예외 영역 내에서 실행된다

pipe 가 예외를 던질 때 Exception Layer 에서 처리된다.

  • 파이프에서 예외가 발생하면, 이후에 컨트롤러 메서드가 실행되지 않는다.
  • 시스템 경계의 외부 소스에서 애플리케이션으로 들어오는 데이터를 검증하기 위한 모범 사례 기술을 제공한다.

Built-in pipes#

Built-in pipes
  • ValidationPipe
  • ParseIntPipe
  • ParseFloatPipe
  • ParseBoolPipe
  • ParseArrayPipe
  • ParseUUIDPipe
  • ParseEnumPipe
  • DefaultValuePipe

ParseIntPipe 를 예를들면,

  • transformation use case
  • 메서드 핸들러 매개변수가 JS Integer 로 변환될 때 실패한다면, 예외를 던진다.
ParseIntPipe
import { ArgumentMetadata, PipeTransform } from '../interfaces/features/pipe-transform.interface';
import { ErrorHttpStatusCode } from '../utils/http-error-by-code.util';
export interface ParseIntPipeOptions {
errorHttpStatusCode?: ErrorHttpStatusCode;
exceptionFactory?: (error: string) => any;
}
/**
* Defines the built-in ParseInt Pipe
*
* @see [Built-in Pipes](https://docs.nestjs.com/pipes#built-in-pipes)
*
* @publicApi
*/
export declare class ParseIntPipe implements PipeTransform<string> {
protected exceptionFactory: (error: string) => any;
constructor(options?: ParseIntPipeOptions);
/**
* Method that accesses and performs optional transformation on argument for
* in-flight requests.
*
* @param value currently processed route argument
* @param metadata contains metadata about the currently processed route argument
*/
transform(value: string, metadata: ArgumentMetadata): Promise<number>;
}

Binding pipes#

파이프 클래스의 인스턴스를 적절한 컨텍스트에 바인드 해야 한다.

예를들어 ParseIntPipe, 파이프를 라우트 핸들러 메서드와 연계하려고 한다.

  • method parameter level 에서 파이프를 바인딩하였다.
  • 인스턴스가 아닌 클래스(ParseIntPipe)를 전달하여 인스턴스화에 대한 책임을 프레임워크에 남겨두고 종속성 주입을 활성화합니다.
1. 클래스 pipe 전달
@Get(':id')
async findOne(@Param('id', ParseIntPipe) id: number) {
return this.catsService.findOne(id);
}

findOne() 메서드에 매개변수가 number 타입이라면 진행되고, 그렇지 않으면 라우터핸들러가 호출되기 전에 에러를 던진다.

GET localhost:3000/abc
{
"statusCode": 400,
"message": "Validation failed (numeric string is expected)",
"error": "Bad Request"
}

내부 인스턴스를 전달하는 것은 옵션을 전달하여 내장 파이프의 동작을 사용자 정의하려는 경우 유용합니다.

2. 클래스 인스턴스 전달
@Get(':id')
async findOne(
@Param('id', new ParseIntPipe({ errorHttpStatusCode: HttpStatus.NOT_ACCEPTABLE }))
id: number,
) {
return this.catsService.findOne(id);
}
query string parameter Pipe
@Get()
async findOne(@Query('id', ParseIntPipe) id: number) {
return this.catsService.findOne(id);
}
ParseUUIDPipe::parse a string parameter and validate if it is a UUID
@Get(':uuid')
async findOne(@Param('uuid', new ParseUUIDPipe()) uuid: string) {
return this.catsService.findOne(uuid);
}
// ParseUUIDPipe()를 사용할 때 버전 3, 4 또는 5에서 UUID를 구문 분석합니다. 특정 버전의 UUID만 필요한 경우 파이프 옵션에서 버전을 전달할 수 있습니다.

Custom pipes#

validation.pipe.ts::behaving like an identity function.
import { PipeTransform, Injectable, ArgumentMetadata } from '@nestjs/common';
@Injectable()
export class ValidationPipe implements PipeTransform {
transform(value: any, metadata: ArgumentMetadata) {
return value;
}
}
PipeTransform
import { Type } from '../type.interface';
import { Paramtype } from './paramtype.interface';
export declare type Transform<T = any> = (value: T, metadata: ArgumentMetadata) => any;
/**
* Interface describing a pipe implementation's `transform()` method metadata argument.
*
* @see [Pipes](https://docs.nestjs.com/pipes)
*
* @publicApi
*/
export interface ArgumentMetadata {
/**
* Indicates whether argument is a body, query, param, or custom parameter
*/
readonly type: Paramtype;
/**
* Underlying base type (e.g., `String`) of the parameter, based on the type
* definition in the route handler.
* undefined 타입이라면,
* * 라우트 핸들러 메소드 signature 에서 type 선언을 생략한 경우
* * 바닐라 JavaScript를 사용하는 경우.
* TS interface 이라면,
* * 트랜스컴파일 시 없어지기 때문에, Object 타입으로 인식된다.
*/
readonly metatype?: Type<any> | undefined;
/**
* String passed as an argument to the decorator.
* Example: `@Body('userId')` would yield `userId`
*/
readonly data?: string | undefined;
}
/**
* Interface describing implementation of a pipe.
*
* @see [Pipes](https://docs.nestjs.com/pipes)
*
* @publicApi
*/
export interface PipeTransform<T = any, R = any> {
/**
* Method to implement a custom pipe. Called with two parameters
*
* @param value argument before it is received by route handler method
* @param metadata contains metadata about the value
*/
transform(value: T, metadata: ArgumentMetadata): R;
}

Schema based validation#

validation pipe 를 좀 더 유용하게 만들 수 있다.

@Post()
async create(@Body() createCatDto: CreateCatDto) {
this.catsService.create(createCatDto);
}
export class CreateCatDto {
name: string;
age: number;
breed: string;
}

createCatDto 의 유효성을 검증하는 FALSY 방법

  1. 라우터 핸들러 메서드에서 검증 → SRP(Single Responsibility Principle) 위반
  2. validator 클래스 생성 → 메서드 시작 마다 validator 를 호출해 줘야 한다.
  3. validation middleware →
    • 전체 응용 프로그램의 모든 컨텍스트에서 사용할 수 있는 일반 미들웨어를 만드는 것은 불가능합니다.
    • 미들웨어가 호출될 핸들러와 해당 매개변수를 포함하여 실행 컨텍스트를 인식하지 못하기 때문입니다.

Object schema validation#

Joi library

스키마를 만드는 직관적이며 가독성이 좋은 API 을 제공한다.

$ npm install --save joi
$ npm install --save-dev @types/joi
Simple JoiValidationPipe class
import { PipeTransform, Injectable, ArgumentMetadata, BadRequestException } from '@nestjs/common';
import { ObjectSchema } from 'joi';
@Injectable()
export class JoiValidationPipe implements PipeTransform {
constructor(private schema: ObjectSchema) {}
transform(value: any, metadata: ArgumentMetadata) {
const { error } = this.schema.validate(value);
if (error) {
throw new BadRequestException('Validation failed');
}
return value;
}
}

다음 세션에서, @UsePipes 로 컨트롤러 메서드에게 적절한 schema 를 제공하는 방법을 다룬다.

Binding validation pipes#

method call level 파이프 바인딩 :: JoiValidationPipe 사용하기 [method-scoped pipe]
@Post()
@UsePipes(new JoiValidationPipe(createCatSchema))
async create(@Body() createCatDto: CreateCatDto) {
this.catsService.create(createCatDto);
}

@UsePipes Process

  1. JoiValidationPipe 의 인스턴스를 생성한다.
  2. pipe 의 생성자에 Joi schema 를 pass 한다.
  3. pipe 를 메서드에 바인드 한다.

Class validator#

  • Nest 는 class-validator library 와 잘 동작합니다.
  • 강력한 데코레이터 기반 validation 을 제공한다.
    • decorator-based validation 은 처리된 프로퍼티의 metatype 에 접근할 수 있기 때문에 Nest 의 Pipe 와 결합될 때 강력하다.
$ npm i --save class-validator class-transformer

class-transformer

  • same author as the class-validator library
  • and as a result, they play very well together.
create-cat.dto.ts
import { IsString, IsInt } from 'class-validator';
export class CreateCatDto {
@IsString()
name: string;
@IsInt()
age: number;
@IsString()
breed: string;
}
Advantage

CreateCatDto 클래스는 Post 본문 개체에 대한 단일 소스로 유지됩니다(별도의 유효성 검사 클래스를 만들 필요가 없음).

validation.pipe.ts::uses class-validator annotations.
import { PipeTransform, Injectable, ArgumentMetadata, BadRequestException } from '@nestjs/common';
import { validate } from 'class-validator';
import { plainToClass } from 'class-transformer';
@Injectable()
export class ValidationPipe implements PipeTransform<any> {
async transform(value: any, { metatype }: ArgumentMetadata) {
if (!metatype || !this.toValidate(metatype)) {
return value;
}
const object = plainToClass(metatype, value);
const errors = await validate(object);
if (errors.length > 0) {
throw new BadRequestException('Validation failed');
}
return value;
}
private toValidate(metatype: Function): boolean {
const types: Function[] = [String, Boolean, Number, Array, Object];
return !types.includes(metatype);
}
}

{7} transform() 는 비동기 메서드이다.

  • Nest 는 동기와 비동기 파이프를 지원한다.
  • (utilize Promises) 와 같이 class-validator validations 이 가끔 비동기 이기 때문이다.

{7} ArgumentMetadata 으로부터 metatype 필드를 destructuring 하였다.

{8} 헬퍼 함수 toValidate()

  • native JavaScript type 일 때, 유효성 검사를 실행하지 않는다.

{11} class-transformer function plainToClass()

  • validation 을 적용하기 위해, 순수 JS argument 객체를 Typed 객체로 변환한다.
  • 네트워크 request 로 부터 deserialized 될 때, post body 는 타입 정보가 없는 객체이다. (underlying platform, such as Express, works).
  • Class-validator 는 DTO 의 decorated 객체를 다루기 위해 변환이 필요하다.

마지막으로, validation pipe 는 변경되지 않는 value 를 리턴하거나, 에러를 던진다.

cats.controller.ts :: ValidationPipe 바인딩하기 [parameter-scoped pipe]
@Post()
async create(
@Body(new ValidationPipe()) createCatDto: CreateCatDto,
) {
this.catsService.create(createCatDto);
}
파이프의 스코프
  • parameter-scoped
  • method-scoped
  • controller-scoped
  • global-scoped

Global scoped pipes#

전역 파이프는 모든 Controller 와 모든 route handler, 어플리케이션 전반에서 사용가능하다.

main.ts :: 의존성 주입이 불가능한 전역 pipe
async function bootstrap() {
const app = await NestFactory.create(AppModule);
app.useGlobalPipes(new ValidationPipe());
await app.listen(3000);
}
bootstrap();

ValidationPipe 는 가능한 한 generic 하게 생성되었다.

  • 전체 응용 프로그램의 모든 route handler 에 적용되도록 global-scoped pipe 로 설정하여 완전한 utility 임을 알 수 있습니다.
warning

하이브리드 앱 에서 useGlobalPipes() 메서드는, 게이트웨이 및 마이크로 서비스에 대한 파이프를 설정하지 않습니다. "표준"(비하이브리드) 마이크로 서비스 앱의 경우 useGlobalPipes()는 파이프를 전역적으로 마운트합니다.

app.module.ts :: 의존성 주입이 가능한 전역 pipe
import { Module } from '@nestjs/common';
import { APP_PIPE } from '@nestjs/core';
@Module({
providers: [
{
provide: APP_PIPE,
useClass: ValidationPipe,
},
],
})
export class AppModule {}

pipe 가 어떤 모듈에서 주입되든, 전역 pipe 가 된다.

The built-in ValidationPipe#

  • 참고로, ValidationPipe 는 Nest 에서 기본 제공되므로, generic validation Pipe 를 직접 구축할 필요가 없습니다.
  • 내장 ValidationPipe 는 이 장에서 만든 샘플보다 더 많은 옵션을 제공합니다.

Transformation use case#

Transformation pipes 는 client request 과 the request handler 사이에 function 을 수행할 수 있다.

  1. string → integer 변환
  2. 필요한 데이터 fields 가 누락되어 있을 때, default 값을 적용하기 위함.
parse-int.pipe.ts
import { PipeTransform, Injectable, ArgumentMetadata, BadRequestException } from '@nestjs/common';
@Injectable()
export class ParseIntPipe implements PipeTransform<string, number> {
transform(value: string, metadata: ArgumentMetadata): number {
const val = parseInt(value, 10);
if (isNaN(val)) {
throw new BadRequestException('Validation failed');
}
return val;
}
}
@Get(':id')
async findOne(@Param('id', new ParseIntPipe()) id) {
return this.catsService.findOne(id);
}

위 예시 보다, Nest 는 더 정교한 내장 ParseIntPipe 를 가지고 있습니다.

유용한 변환 사례 3. 요청에 제공된 ID를 사용하여 데이터베이스에서 userEntity 를 선택
@Get(':id')
findOne(@Param('id', UserByIdPipe) userEntity: UserEntity) {
return userEntity;
}

Providing defaults#

DefaultValuePipe
@Get()
async findAll(
@Query('activeOnly', new DefaultValuePipe(false), ParseBoolPipe) activeOnly: boolean,
@Query('page', new DefaultValuePipe(0), ParseIntPipe) page: number,
) {
return this.catsService.findAll({ activeOnly, page });
}
Default_Value_Pipe
  • Parse* pipes 는 null 혹은 undefined 값을 수신할 때 에러를 던진다.
  • 누락된 querystring parameter 값에, default value 를 제공할 수 있다.
  • Parse* pipes 가 연산되기 전에 기본 값을 주입 한다.
  • @Query() 의 Parse* pipes 전에 초기화를 해줘야 한다.
Last updated on